System Setting
A System Configuration define advanced setting includes “Notification & Event Alert”, “System”, and “Product Activation. These settings are usually changed less often or only need to be modified once. Some functions require root, admin to modify or be visible, and product activation only shown on perpetual license, such as Standalone, Azure Kubernetes version.
Notification
Here are seven notification services, include tradition service (SMS, Email) and popular social media (LINE, WeChat, Telegram, Microsoft Teams, Slack), if you select the event log type on “Notification Item”, the notify message will through these services.
These notification services are global setting, if your account does not receive, please check the personal setting on Account.
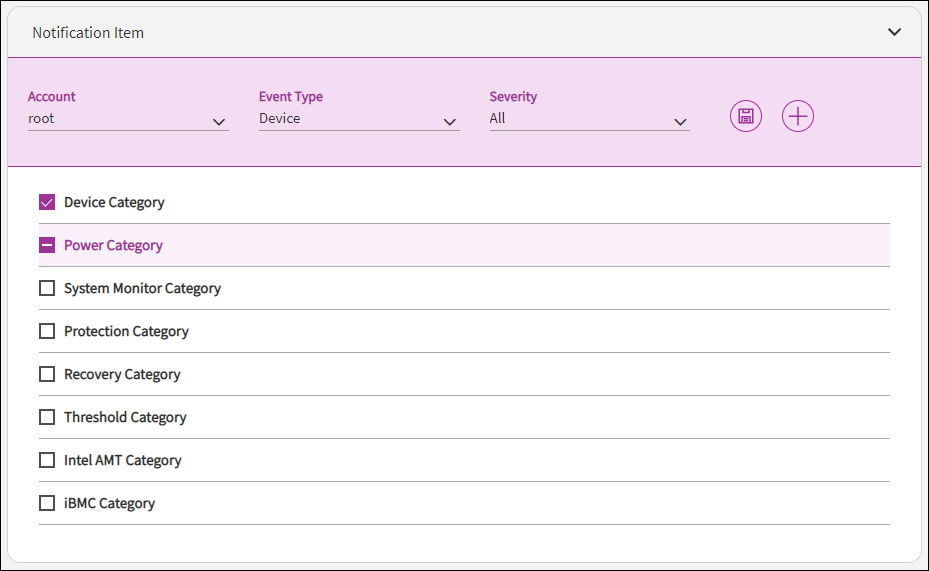
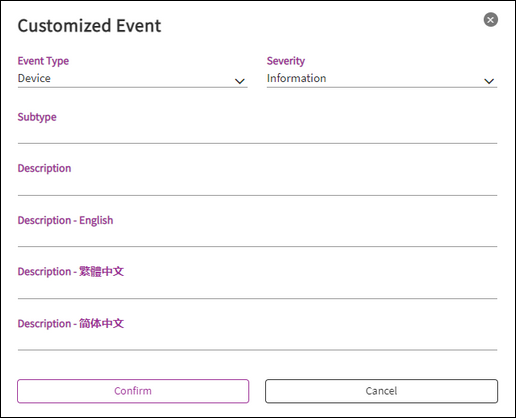
Click on ![]() icon to add custom event log item, if you try to develop a plugin and send custom logs type from DeviceOn Agent.
icon to add custom event log item, if you try to develop a plugin and send custom logs type from DeviceOn Agent.
Mail Setting
The configuration of using email as one of event notification services is a system-wide setting. This means DeviceOn uses the server, the one you set in this step, to send all emails. Therefore, uses email settings from your organization is recommended, rather than uses your personal Gmail. If you really want to use Gmail, the situations you are running into may vary and depends on your google account settings. So, in this lab, we assume that you have already a valid business email address from your company.
Step 1: Click “Setting” menu on the left-hand side of DeviceOn portal and then, “Notification”. Click “EMail” bar to open settings regarding email notification service.
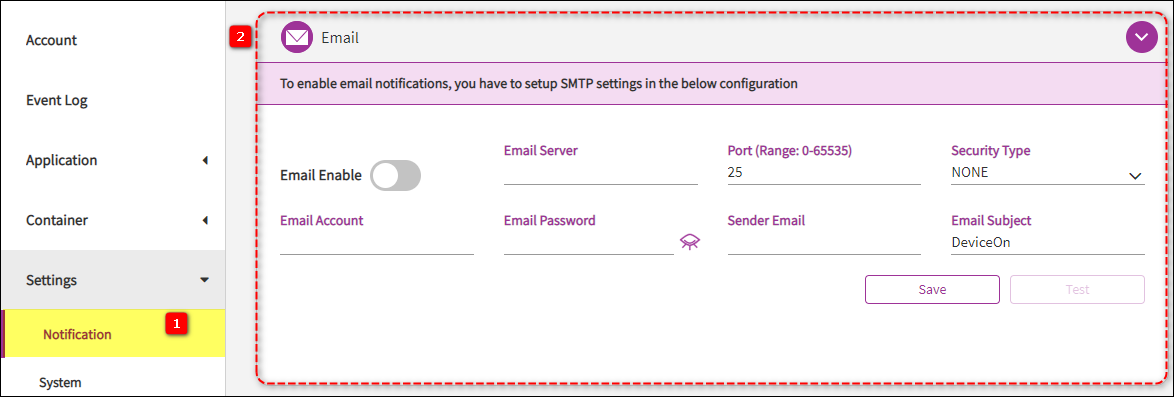
Step 2: Toggle “On/Off” switch to enable this feature. Then fill fields up with proper values. And end up this step by clicking “Test” button.
EMAIL SERVER: The email server host name.
PORT: The email server port. Normally this is 25.
SSL/TLS: Toggle to a proper setting.
EMAIL ACCOUNT: Your email account name. If takes the windows domain into account, a value format like “DOMAIN\USER” should be used.
EMAIL PASSWORD: Your password to sign in to the email server.
SENDER EMAIL: Your email address.
EMAIL SUBJECT: Leave it the default.
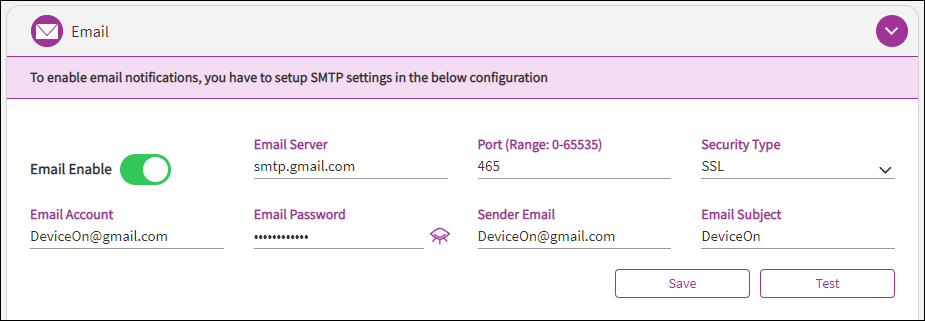
Step 3: To assert all values are correct, click “Test” button, on the bottom right of the page, to open the “Send Email for Testing” dialog for testing purpose. And fill a recipient email as well as email body. Then click “Test” on this dialog. An email you should receive in a while later. Revise them until you got a test email.
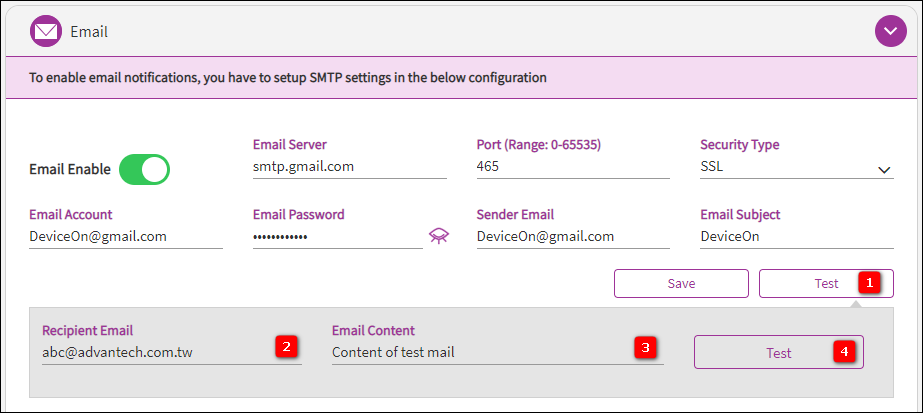
Step 4: Click “Save” on the bottom right of the page that shows in step 2 to keep all settings and enable email notification service.
SMS (Short Message Service)
For traditional emergency notifications, integrated the SMS method that powered of Clickatell service providers.

WeChat
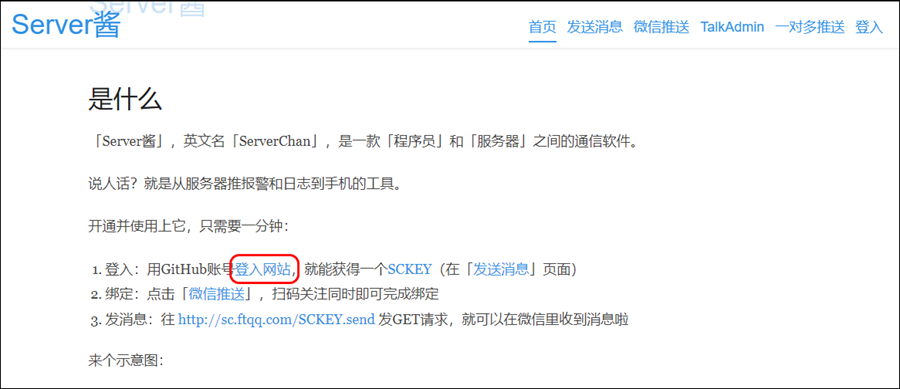
Step 1: Go to http://sc.ftqq.com/3.version. Click “登入网站” hyperlink.
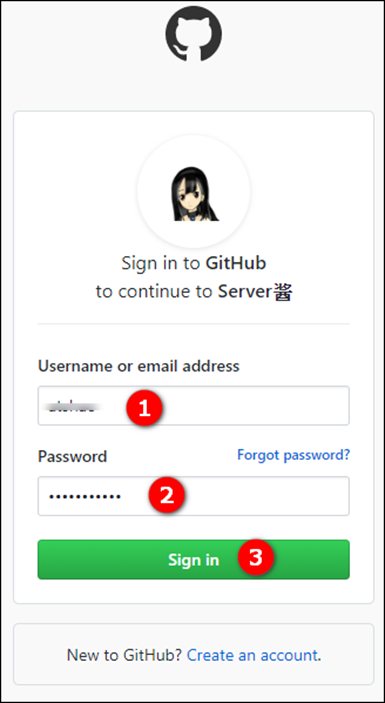
Step 2: Sign in with your GitHub account.
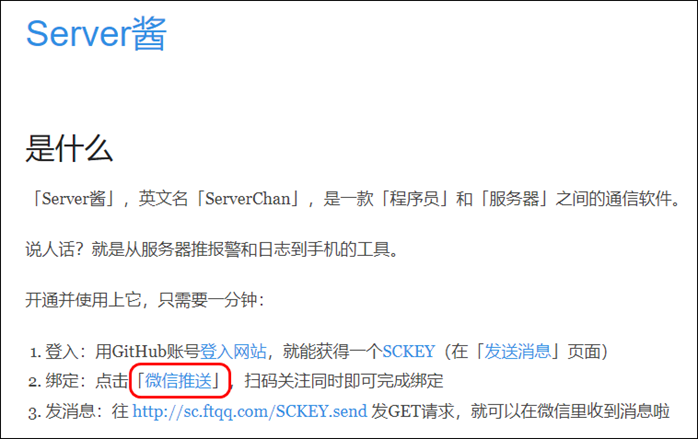
Step 3: Click “微信推送” hyperlink.
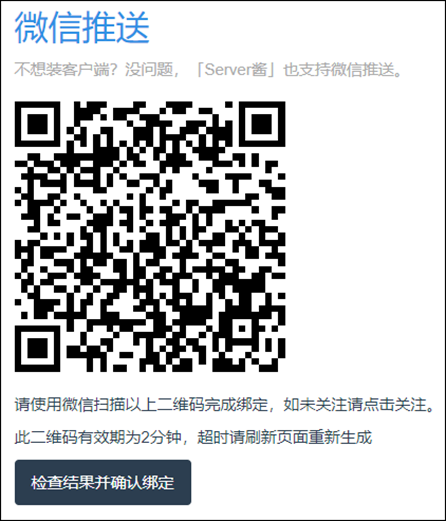
Step 4: Click “开始绑定”. It opens a QR code image.
Step 5: Take your mobile up, swipe and open WeChat App to scan this generated QR code so that the service can bind with your WeChat account.
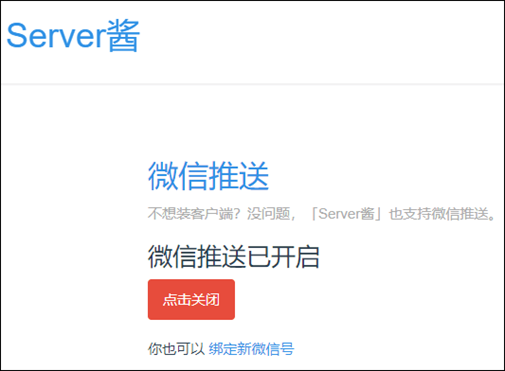
Step 6: Once it is done. The page changes, like below.
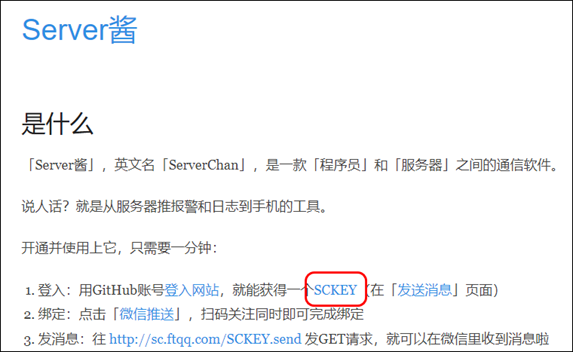
Step 7: Click “SCKEY” hyperlink and copy, from the opened page, the SCKEY value.

Step 8: Now switch your browser to DeviceOn portal. Click “Setting” menu on the left-hand side, then “Notification”, and “WeChat” to open settings regarding WeChat event notification service.

Step 9: Toggle “On/Off” switch to enable this feature. Click “Test” to show the test dialog up. Paste the copied SCKEY, copied in step 7, into the first field “WECHAT SC KEY”. Give a title to the second field “WECHAT MESSAGE TITLE”. Write some message content to the last field “WECHAT MESSAGE CONTENT”. And click “Test” to see if it works or not.
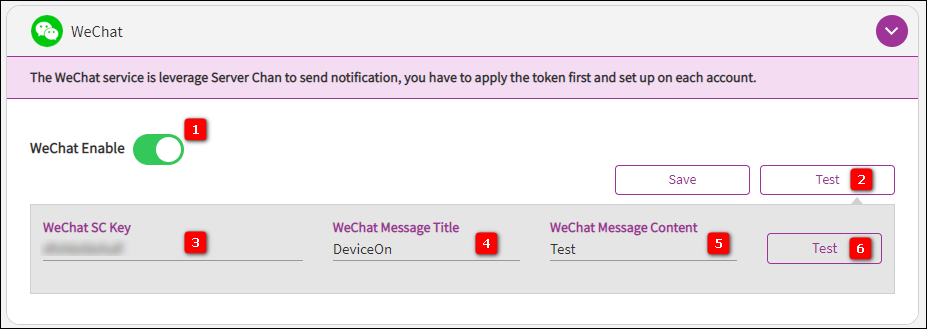
Step 10: Click “Save” button that shows in step 9 to keep your settings and enable WeChat event notification service.
LINE
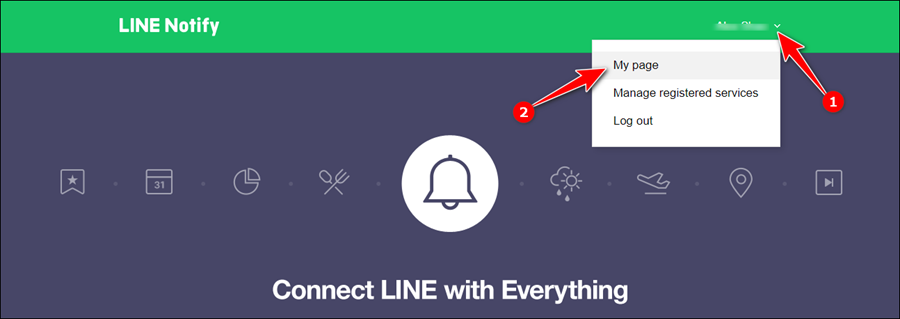
Step 1: Go to https://notify-bot.line.me/ and sign in with your LINE account. Click “My Page” from your account’s dropdown menu in the upper right of the page.
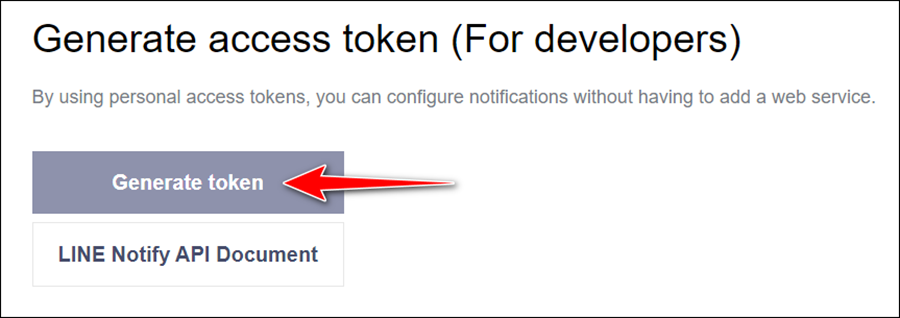
Step 2: Click “Generate token” under “Generate access token (For developers)”. It pops up the “Generate token” dialog.
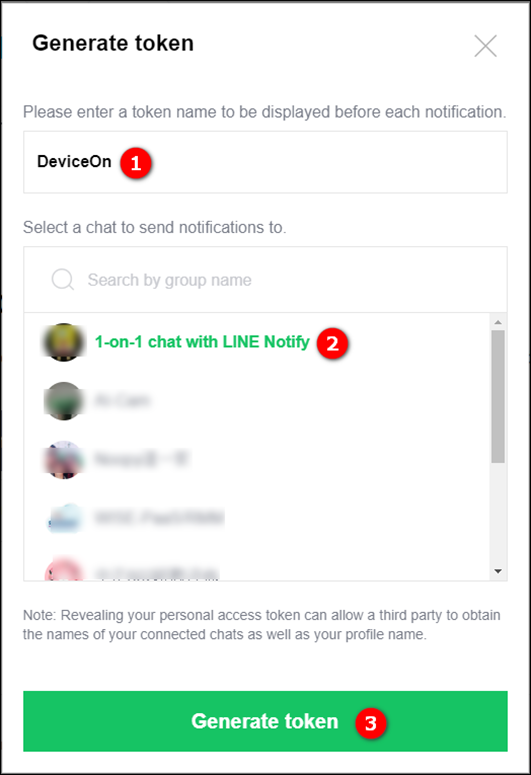
Step 3: Fill token field up with “DeviceOn” and click the “1-on-1 chat with LINE Notify” item. Then click the “Generate token” button in green at bottom.
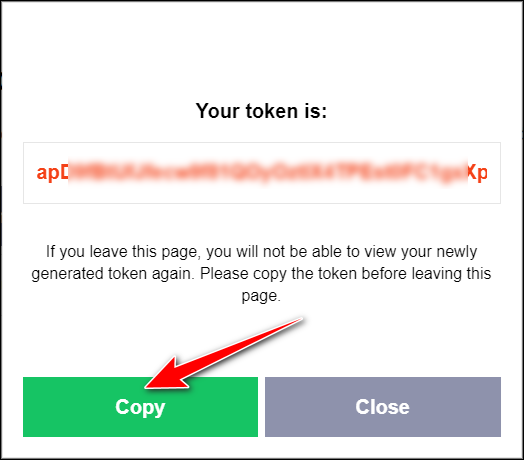
Step 4: A new window pops up with token. Meanwhile, a LINE message about this token generation received immediately. Click “Copy” to keep the token in memory, or any file you like.
Step 5: Now switch your browser to DeviceOn portal. Click “Setting” menu on the left-hand side, then “Notification”, and last “LINE” bar to open settings regarding LINE event notification service.

Step 6: Toggle “On/Off” switch to enable this feature. Click “Test” to show the test dialog up.

Step 7: Paste the copied token into the first field (LINE Token) and write something into the second field (LINE Message Content). Click “Test”, you should receive the messages you wrote with “DeviceOn” as the prefix.
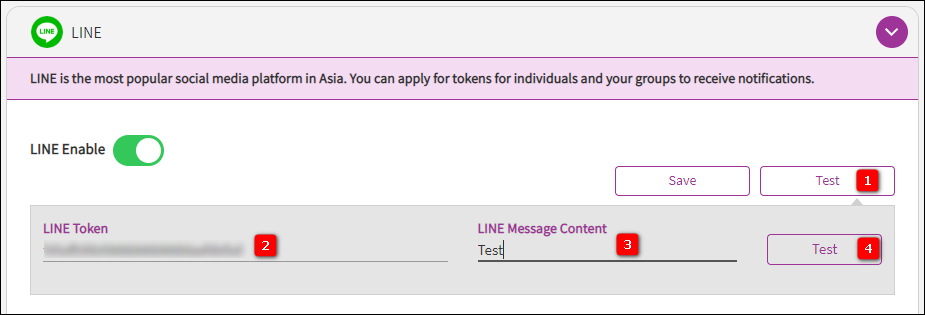
Step 8: Click “Save” button that shows in Step 6 to keep your settings and enable LINE event notification service.
Telegram
Step 1: Search “BotFather” and start to chat on your Telegram App.
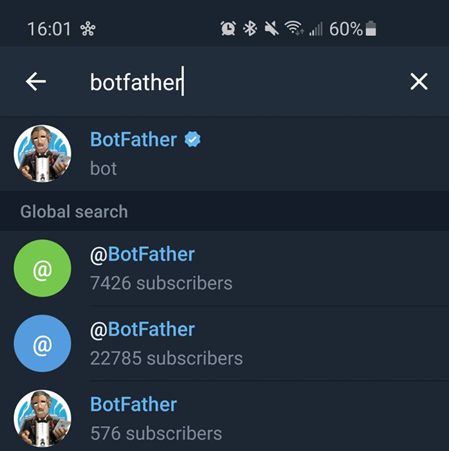
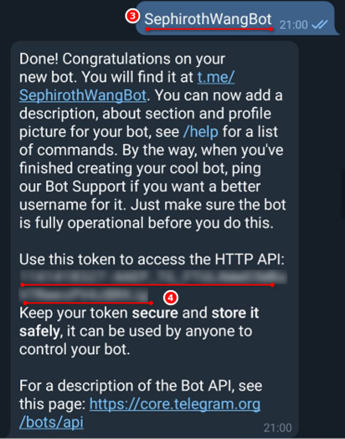
Step 2: Create a new bot and generate an authorization token. Use the /newbot command to create a new bot. The BotFather will ask you for a name and username, then generate an authorization token for your new bot. The name of your bot is displayed in contact details and elsewhere.
The Username is a short name, to be used in mentions and t.me links. Usernames are 5-32 characters long and are case insensitive, but may only include Latin characters, numbers, and underscores. Your bot’s username must end in ‘bot’, e.g. ‘tetris_bot’ or ‘TetrisBot’.
The token is a string along the lines of 110201543:AAHdqTcvCH1vGWJxfSeofSAs0K5PALDsaw that is required to authorize the bot and send requests to the Bot API. Keep your token secure and store it safely, it can be used by anyone to control your bot.

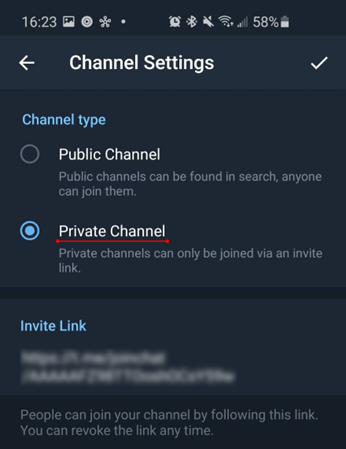
Step 3: Create your private channel on Telegram

Step 4: Invite your bot into the channel.
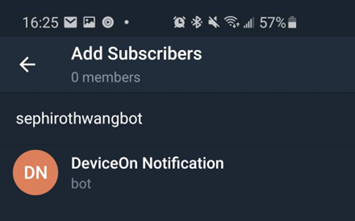
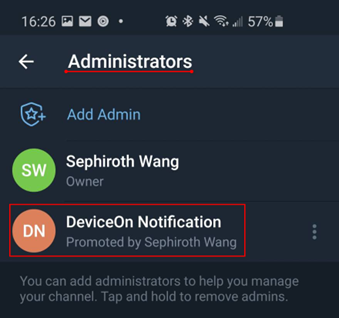
Step 5: Set your bot as “Administrators”
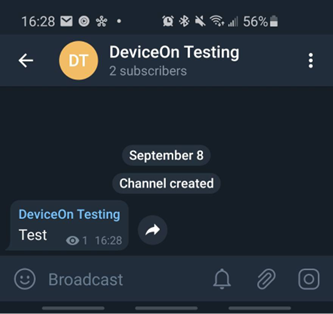
Step 6: Enter any txt message in the channel.
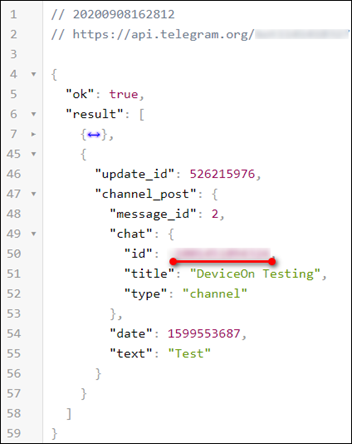
Step 7: Retrieve the chat id via below URL with your authorization token (Step 2).
https://api.telegram.org/botTOKEN/getUpdates
The response that include your chat id as below example.
Step 8: Now switch your browser to DeviceOn portal. Click “Setting” menu on the left-hand side, then “Notification”, and “Telegram” to open settings regarding Telegram event notification service.

Step 9: Toggle “On/Off” switch to enable this feature. Click “Test” to show the test dialog up. Paste the copied Token and chat id, copied in step 2 and step 6. Give a title to the second field “Telegram Message Content”. Write some message content to the last field “Test”. And click “Test” to see if it works or not.
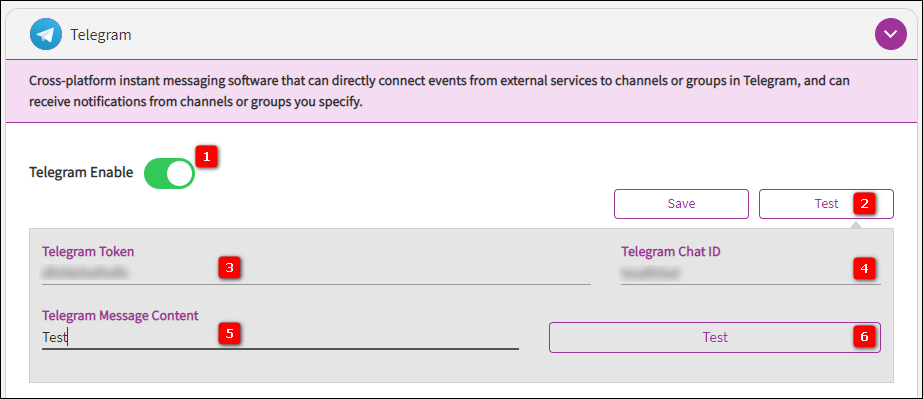
Step 10: Click “Save” button that shows in step 9 to keep your settings and enable Telegram event notification service.
Microsoft Teams
Step 1: In the function menu of the channel where you want to send the message, select…(Other), and select the connector in the menu.
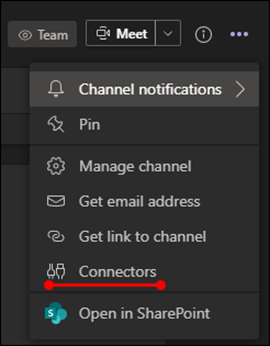
Step 2: Select “Incoming Webhook”

Step 3: Give this connector a name, then press the create button.
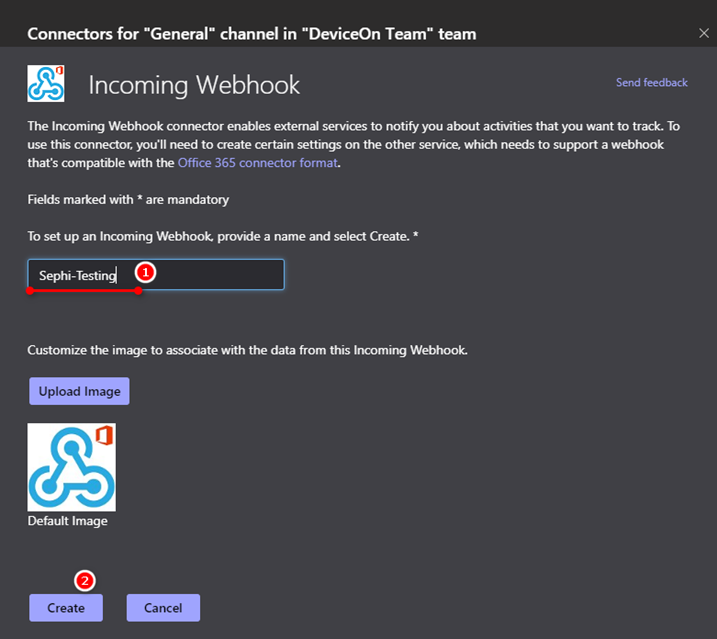
Step 4: At this time, a set of URLs will appear, which are used to transfer message. After copying, press the “Done” button.

Step 5: Now switch your browser to DeviceOn portal. Click “Setting” menu on the left-hand side, then “Notification”, and “Microsoft Teams” to open settings regarding Teams event notification service.

Step 6: Toggle “On/Off” switch to enable this feature. Click “Test” to show the test dialog up. Paste the URL, copied in step 4. Give a title to the second field “Microsoft Teams Message Content”. Write some message content to the last field “Test”. And click “Test” to see if it works or not.
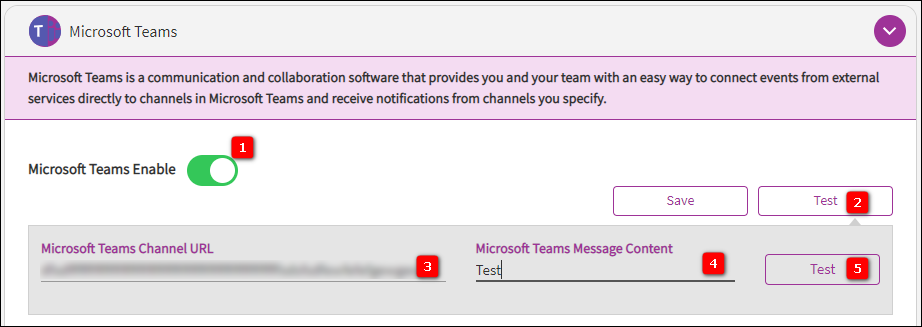
Step 7: Click “Save” button that shows in step 6 to keep your settings and enable Microsoft Teams event notification service.
Slack
Step 1: Create your channel on your Slack.
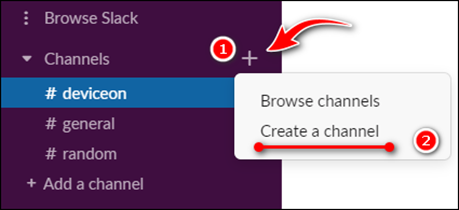
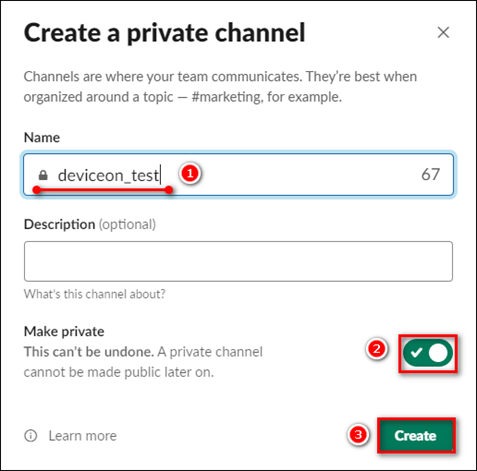
Step 2: Give this channel name and set as private.
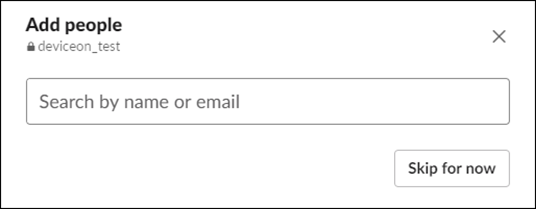
Step 3: Skip or add your member into channel.
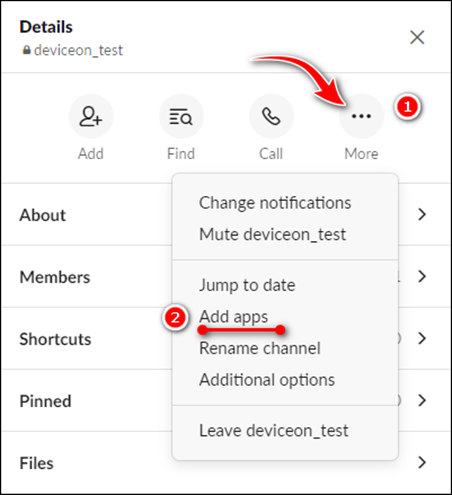
Step 4: After logging in to slack, there will be a row of menus on the right, click “Apps” to expand the sub-menu, and then click “Add Apps”

Step 5: A search box will appear, type “webhooks” and you will see the first result is “Incoming WebHooks”, then click to install and “Add to Slack”.
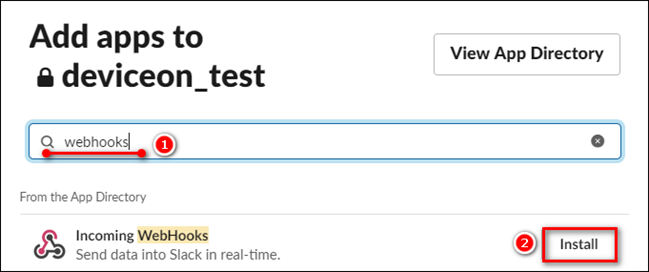
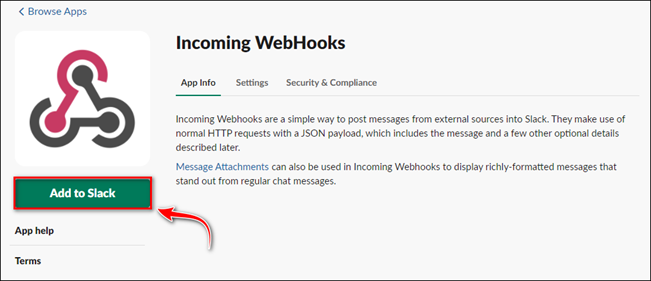
Step 6: Click “Add to Slack”, and a menu will appear asking which channel to install on. After selecting it, click “Incoming WebHooks integration”.

Step 7: After installation, you will enter the setting page of incoming webhooks. The first line of the page “Webhook URL” is the most important. We can send out automatic notification messages as long as we post to this url.

Step 8: Now switch your browser to DeviceOn portal. Click “Setting” menu on the left-hand side, then “Notification”, and “Slack” to open settings regarding Slack event notification service.
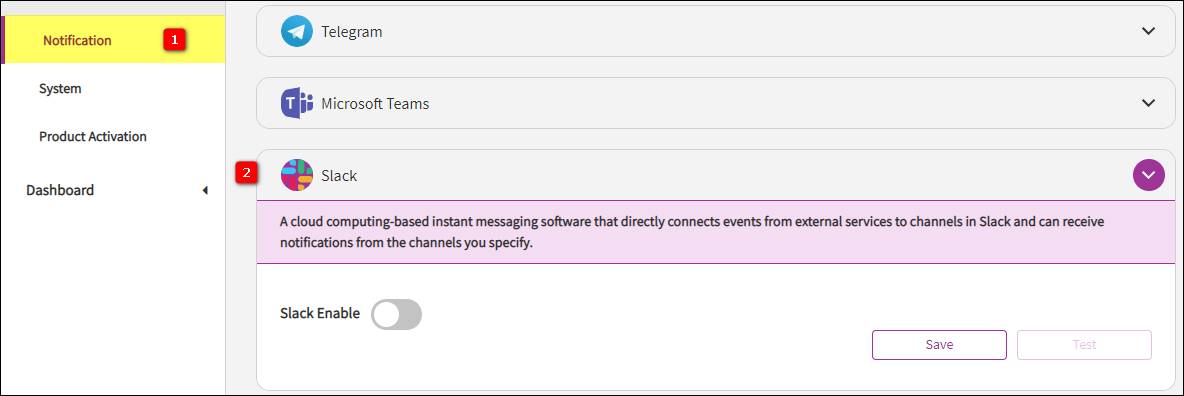
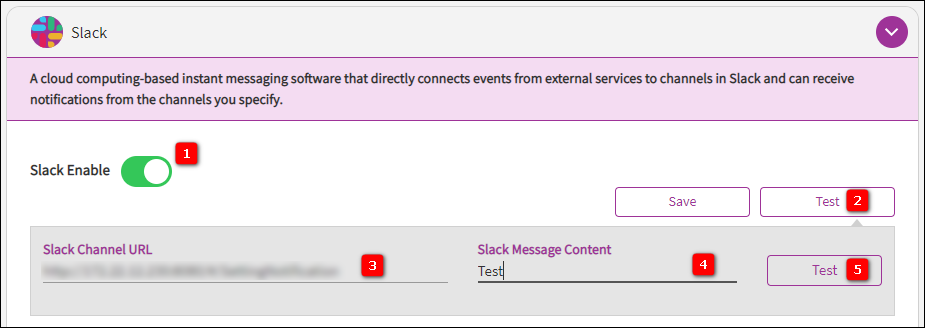
Step 9: Toggle “On/Off” switch to enable this feature. Click “Test” to show the test dialog up. Paste the URL, copied in step 4. Give a title to the second field “Slack Message Content”. Write some message content to the last field “Test”. And click “Test” to see if it works or not.
System
System UI

Menu
The default settings do not enable "IPMI," "OTA" (Replaced by App Management), "Addins," and "System Report" The "AddIns" feature is used to customize the UI page or embed a specific website page for integration with DeviceOn.

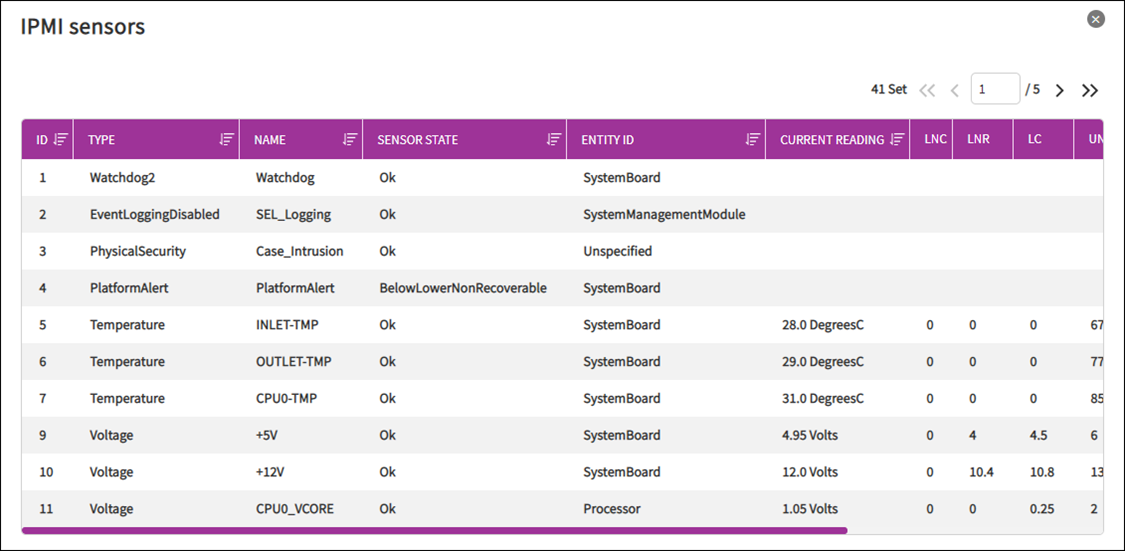
IPMI
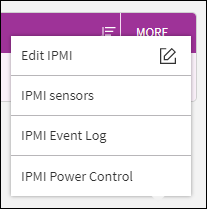
The Intelligent Platform Management Interface (IPMI) is a standardized message-based hardware management interface. At the core of the IPMI is a hardware chip that is known as the Baseboard Management Controller (BMC), or Management Controller (MC). DeviceOn integrate standard functions as below to retrieve device status and power management.
Sensors (“sensor” and “sdr” related commands) — practically using all the IPMI sensors as data source in DeviceOn.
SEL (System Event Log)
Power on/off/graceful shutdown/cycle as well as reset commands
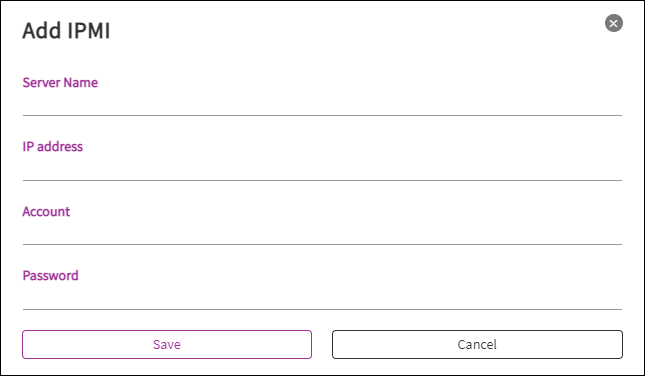
Click on More option to view the device sensor, event log and power control.
System Report
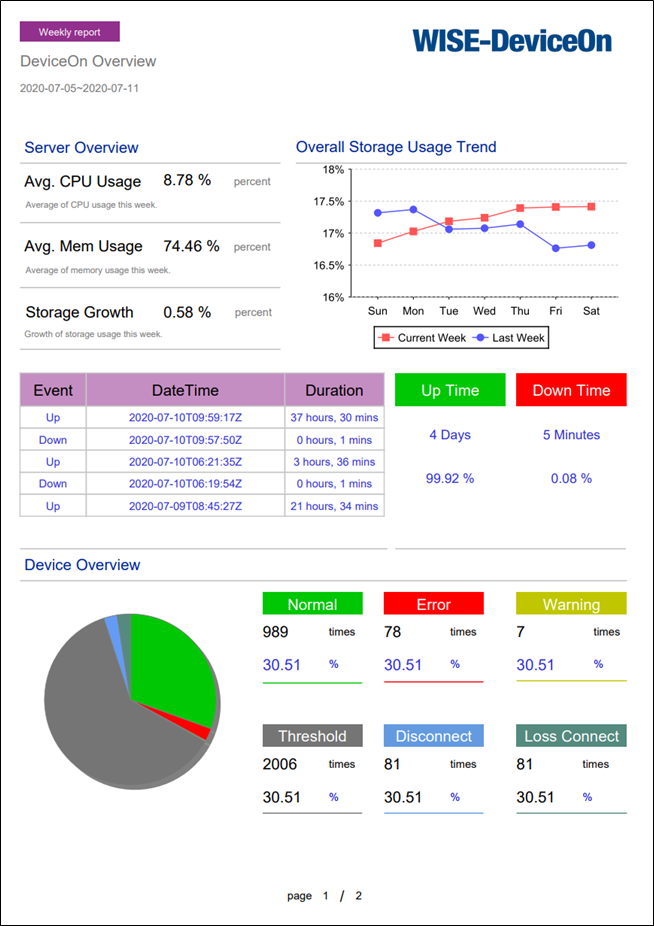
Second, if the System Report be enabled will appears to the menu item. The system report takes week as the unit (Sunday to Saturday), and the generation time is every Sunday 00:00 (server time zone). The report retention time can be set up to 365 days. After enabling the system report function, you could search and download PDF reports within the interval.
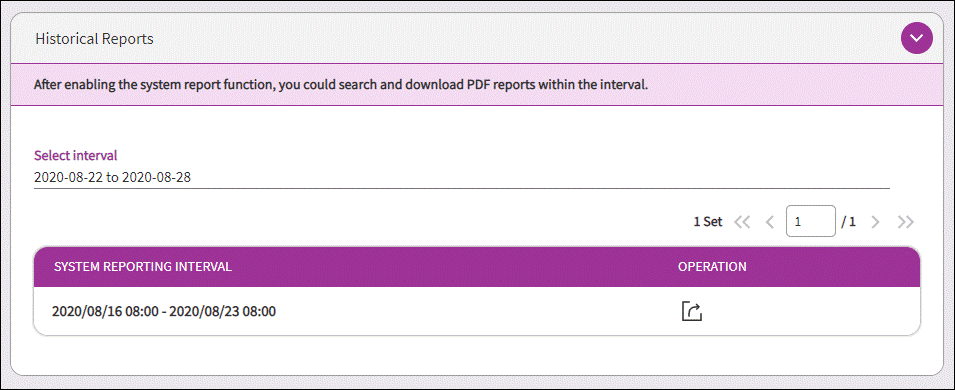
From the system report, you may realize the whole status, including server uptime, downtime and managed devices healthy for the pass week.
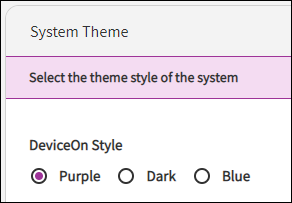
Theme
Select the theme style of the system
Logo
Product logo customized, supported formats: GIF, PNG, JPEG/JPG. We recommend the image with a height is less than 55 pixels.

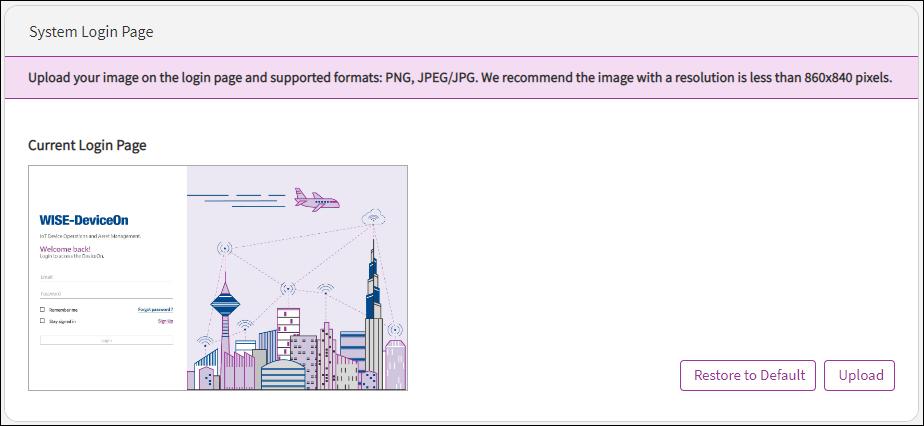
Login Page
Login page customized, supported formats: PNG, JPEG/JPG. We recommend the image with a resolution is less than 860x840 pixels.
Overview Dashboard
To show/hide or drag the the components on the overview.
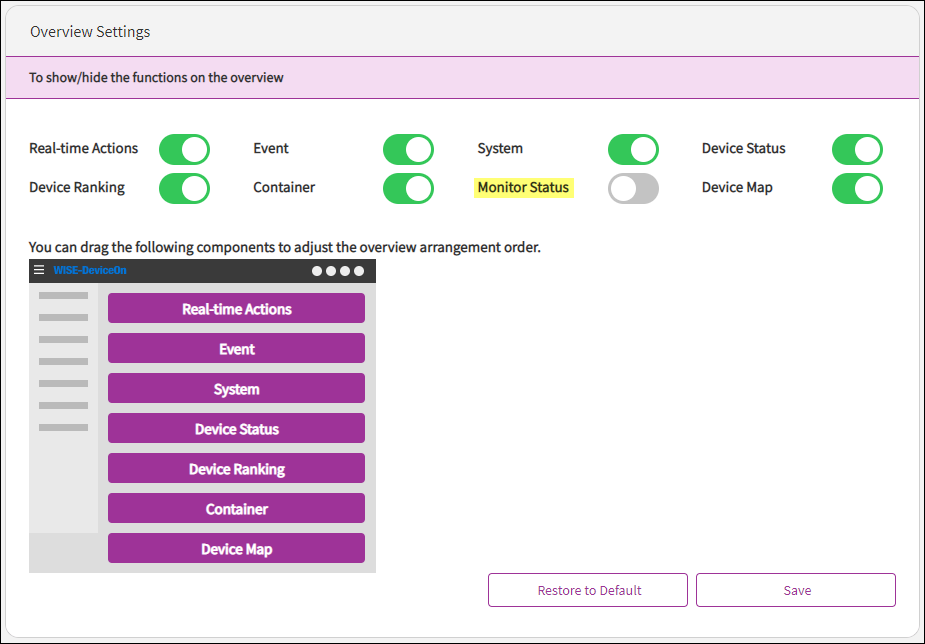
Monitor Status is used to monitor the external monitor (HDMI) on the device. When the external monitor signal is abnormal, or the power supply is lost, it can be displayed on this Dashboard immediately, and the administrator will be notified. The feature is disabled by default.
Language
Set display language, (English, Traditional Chinese and Simplified Chinese)
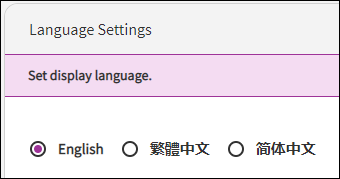
System Setting
Server Time Zone
Set the server time zone, which only affects the event log time of the notification message

Account Settings
Account Registration
Enable account registration, users can sign up an account in the login page, the default role is the device administrator.
Please make sure your SMTP server be configured properly.

2FA Authentication:
Force enable for all account. All user must to register through third-party authenticator, such as Google Authenticator or Authy.
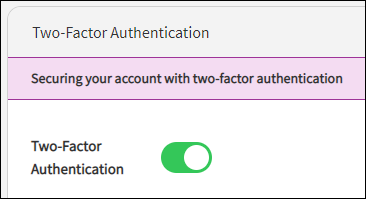
Failed Login Lockout
Enforces a temporary account disablement after exceeding a defined threshold of consecutive unsuccessful authentication attempts.

LDAP
Configure LDAP Server Setting
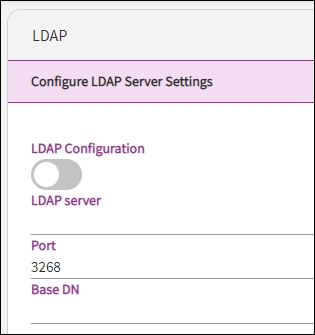
X.509 Certificate (Device Authentication)
DeviceOn supports x.509 certificate authentication for use with a secure TLS/SSL connection. The x.509 edge device authentication allows device to authenticate to servers with certificates rather than with a username and password.
Remote Storage (SMB/CIFS) for Acronis Backup
Support for remote device system backup to SMB/CIFS instead of a local drive, and recovery from SMB. For instance, a user could generate a golden operation system image, then restore to hundry of device in a factory, if needed. You also can leverage Azure file to mount a SMB on your remote system to achieve cloud backup.

Please make sure that Acronis is installed on your managed devices and has access to the SMB location.
Data Export (Backup Device Data to Cold Storage)
The data export help to dump your sensor data as CSV or JSON format and upload to your cold storage, such as Azure Blob, AWS S3 and FTP for advance data ingestion and learning through third-party. The generation time is every Sunday.
Webhook
In addition to the existing event notification via social media services (LINE, WeChat, Teams, Slack, Telegram), it also supports the integration of third-party APIs via Webhook. Such as Microsoft Dynamics 365 Field services.
Intel Open AMT
Open Active Management Technology Cloud Toolkit (Open AMT Cloud Toolkit) provides open-source, modular microservices and libraries for integration of Intel® Active Management Technology (Intel® AMT). Through the Open AMT, users can access AMT devices cross network to provide Out-of-band (OOB) management. Please refer to the document to create your Open AMT service.
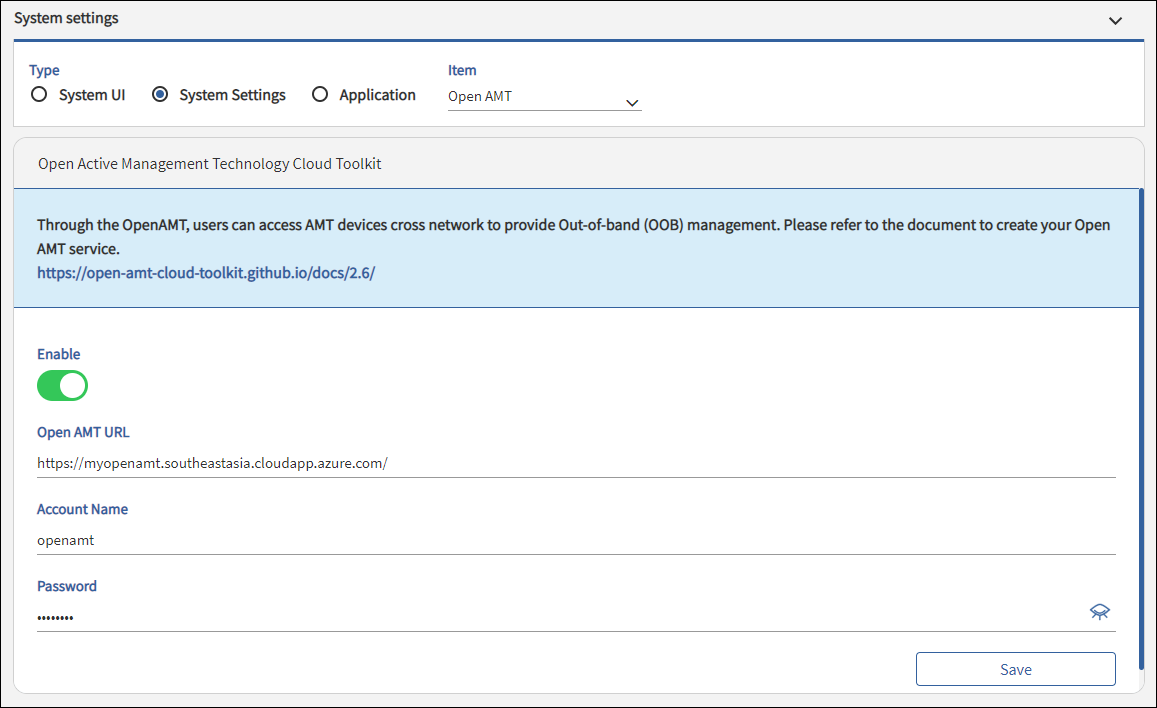
After deployed and configured, do not forget to bind your device GUID, go to Edit device then input the GUID.
Syslog
Syslog is a standard for message logging. It allows separation of the software that generates messages, the system that stores them, and the software that reports and analyzes them. Each message is labeled with a facility code, indicating the type of system generating the message, and is assigned a severity level. DeviceOn may use syslog for system management and security auditing as well as general informational, analysis, and debugging messages.
Device Logs
Remotely collect and download device system logs instantly then upload to your repository.
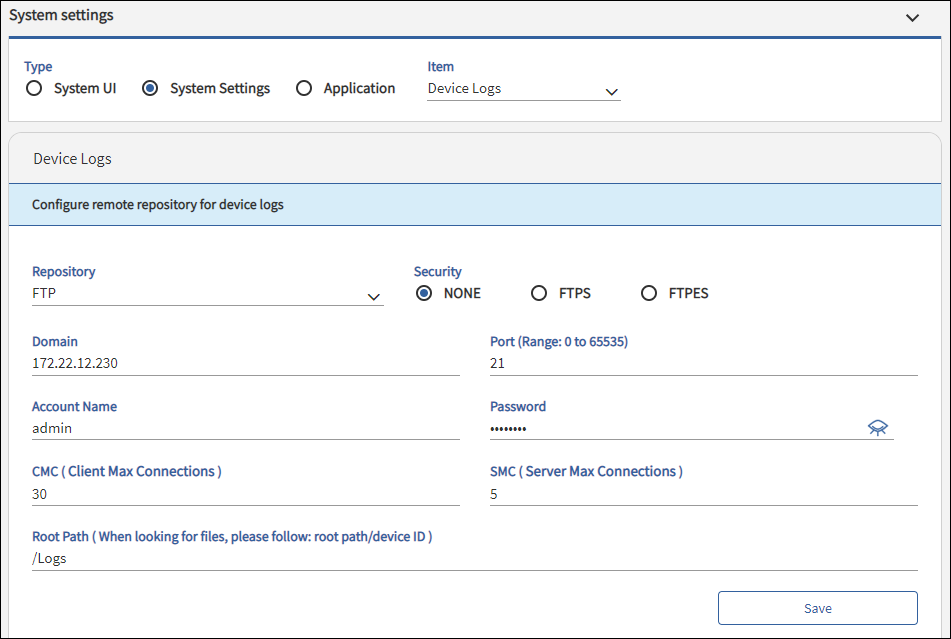
BTW, if you want to change the remote repository of the device log, the database will not retain the previous request records, but the log files will still remain in your original space.
Device File Synchronization
Synchronize the default folder (DeviceOn Agent/filesync) on the device to cloud repositories. You could determine the sync interval or enable the file encryption for security.

After configured, you could enable the function on your devices, go to Edit device and enable file sync.
System Backup
Enables scheduled backups of DeviceOn server settings, databases (excluding MongoDB sensor data), with adjustable backup retention policies. Integrated utility restores system to previously known working state when failures occur. Please refer to the documentation for the detailed steps regarding the backup and recovery procedures.
Application
Offered by
App developer or company name.
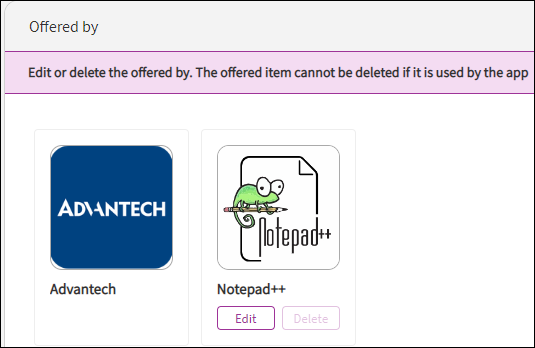
Contact Support
App developer and contact mail.
Product Activation
Starting from Version 4.5, we have adjusted the license mechanism, DeviceOn provides two methods to activate the license, you can directly go to WISE-Marketplace to purchase or go to the Request Form to apply for a trial license. After you apply, the product team will review your request then send back the license file.
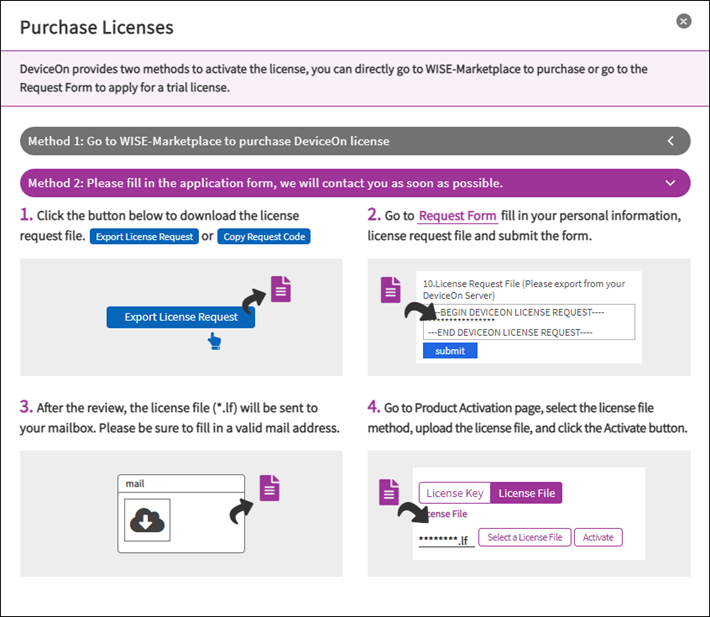
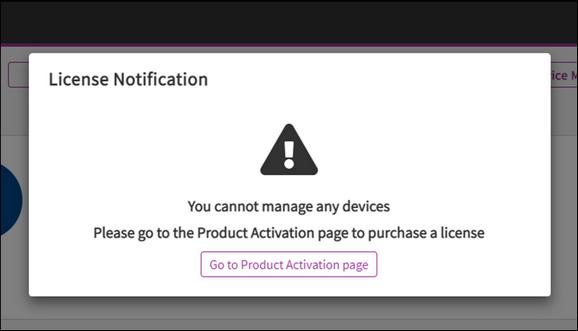
When you log in for the first time, you will be prompted that you do not have any license to manage the device, please purchase or apply for a license first.
After obtaining the License key or File, the license status and record of the server will be displayed after import.
Note that the License Key is the old mechanism. After converting to the new mechanism (License File), we no longer support the old.

Managing DeviceOn Licenses: Activation, Expiration and Trials
How to purchase DeviceOn license from WISE-Marketplace
Last updated