Enable Windows Lockdown Features
For devices protection, Windows built many nice features in natively. For instance, function key protection disables Ctrl, Alt, and WinKey. UWF protection guarantees your disk C (System Partition) rollbacks to the original state after you reboot the Windows operating system. This lab guides you how to enable Windows lockdown features, and how to active/inactive them via DeviceOn portal. After this lab, you should:
Learn how to enable “Keyboard Filter” and “Unified Write Filter” (a.k.a. UWF) in Windows lockdown features.
Know what lockdown features can be controlled via DeviceOn portal.
Prerequisite
A running DeviceOn server.
A device which running on Windows 10 operating system (LTSB, LTSC) and installed WISE-Agent, that connects to DeviceOn server. Besides, this agent must install Advantech SUSI driver, or lockdown feature should not work properly.
Steps to Enable Windows Lockdown
Step 1: Go to the target agent device and open the file explorer window. In address bar, key “Control Panel\All Control Panel Items\Programs and Features” in and followed by pressing “ENTER”. It opens the “Programs and Features” window.

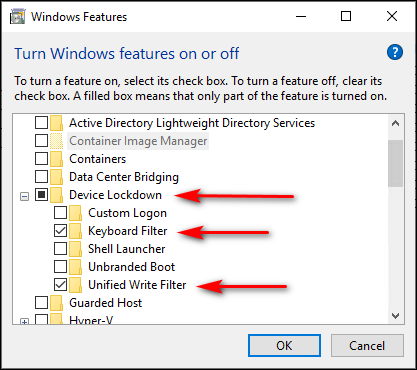
Step 2: Click “Turn Windows features on or off” on left hand side to open “Windows Features” window.

Step 3: Scroll down the window, find and open the “Device Lockdown” item. Make sure both “Keyboard Filter” and “Unified Write Filter” are checked. Then click “OK”.

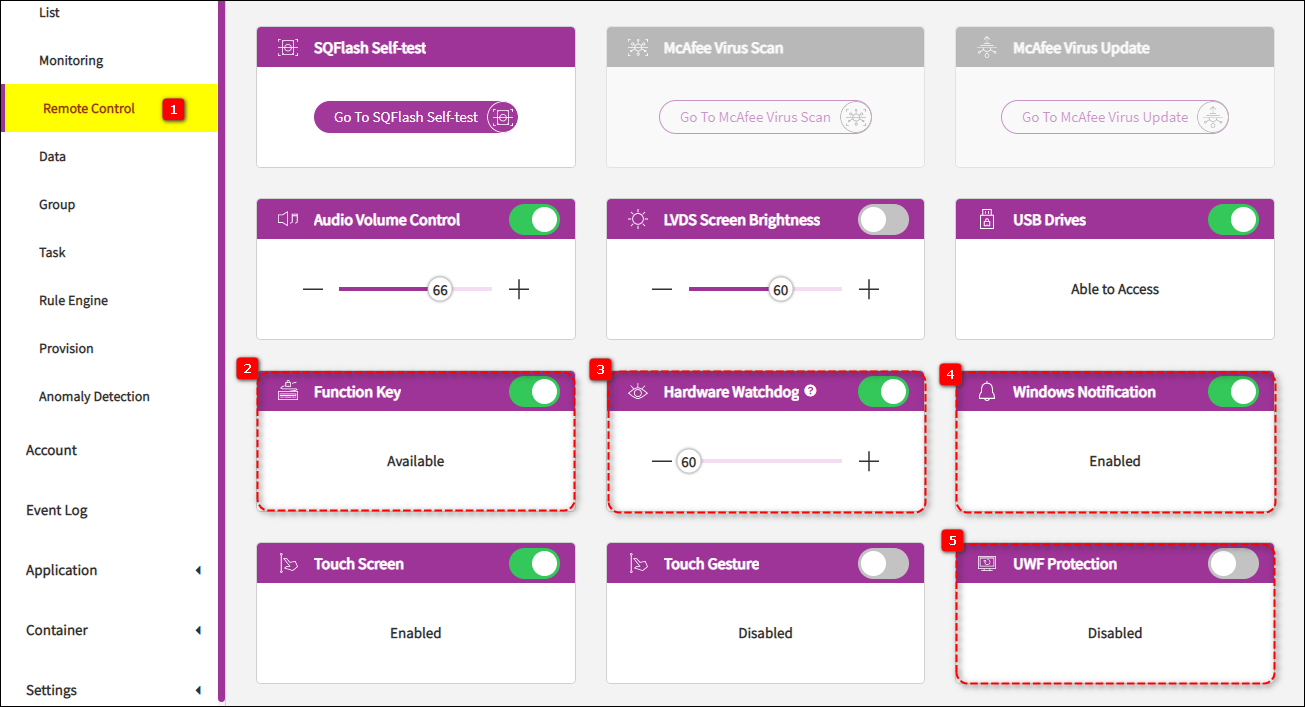
Step 4: Now back to DeviceOn portal. Click “Device” menu item, then “Remote Control” tab. And choose proper account, group, and device from “SELECT ACCOUNT”, “SELECT DEVICE GROUPS”, and “SELECT DEVICE” fields accordingly. You can see “Function Key”, “UWF Protection” control buttons there. Also, other than these two mentioned, “Watchdog Protection”, “Windows Notification” and more relevant features are available as you can see.

Step 5: Click “Function Key” control button. You would find, after a while, the description of “Function Key” changes from “Available” to “Ctrl, Alt, WinKey Lockdown”. If you try to press such keys on the target device, they should not work as expected. Okay, you learned how to enable, disable “Function Key” lockdown. Let’s go ahead and learn something regarding UWF.
Step 6: Click “UWF Protection” control button. A dialog pops up and the message shows that this action will reboot the device. Click “CONFIRM”, its description changes from “Disabled” to “Enabled”. Just wait for the reboot completed.
Step 7: Now, write some data into disk C. You can, for example, download files into disk C, copy files into disk C. Or even generate by programmatically. Just do whatever you can do to mimic that you are working on disk C.
Step 8: Once you finish your tasks, reboot the target device. You would find that all those data you made at previous step disappear. The disk C rollbacks to the original state and just like you did nothing at all.
Last updated