User Interface
The newest DeviceOn Agent moves beyond just providing connectivity to enable more robust monitoring capabilities across managed endpoints. This version comes with an entirely redesigned web-based interface that reduces the agent’s footprint by approximately 50% compared to previous versions. The web-based interface allows the agent to achieve true cross-platform support, capable of running on both x86 Windows/Linux platforms as well as RISC-based systems.

Agent User Interface
The Agent interface has four main sections. The first page shows basic device information like OS version, CPU, memory and connectivity details. The second section is for real-time monitoring of the system and hardware. The third section is for system protection, primarily using Acronis and Trellix. Finally, the advanced settings section covers connectivity and other system configurations.
The Agent interface has four main sections. The first page shows basic device information like OS version, CPU, memory and connectivity details. The second section is for real-time monitoring of the system and hardware. The third section is for system protection, primarily using Acronis and Trellix. Finally, the advanced settings section covers connectivity and other system configurations.

The topmost section shows the device’s current status, including:
Connection Status: A green light indicates a successful connection to the DeviceOn Server. Otherwise, this area will appear grayed out.
Device Name
Edit Device Name - Allows changing the device name

Device version history
Unique Device ID
Language switcher - Toggle between multiple language options
Connect/disconnect from the DeviceOn Server
Information and Overview
The Overview screen displays basic device information including OS version, CPU, memory, and connectivity details. For Advantech hardware with the SUSI driver installed, the model name and SUSI version number will automatically appear. Clicking the model name links to the product page for that hardware.
When connected to the DeviceOn Server, the top indicator light will show green. Additionally, the Overview will display the Server URL and a QR code. You can scan the QR code with a mobile device to start remote management.

Real-time Monitoring
The Real-Time Monitoring section displays system-level information including CPU usage, memory utilization, network traffic, disk space, running processes, and more. For Advantech hardware, additional sensors (Voltage, GPIO, FAN and etc.) are enabled via the SUSI Driver.
The monitoring interface matches the DeviceOn Server, but connecting to the server is not required for local monitoring on the device itself. Some features like the Rule Engine and historical data storage are only available on the DeviceOn Server. For real-time monitoring locally on the device, no server connection is necessary.

System Shield
If Acronis (for backup/recovery) or Trellix (McAfee) (for system protection) are not yet installed on the device, a download button will appear. Click the download button to get the installer and install the software locally.

After downloading the Acronis package and unzipping it, right-click on the Administrator and run AcronisInstaller.exe.

Click Agree EULA to install.

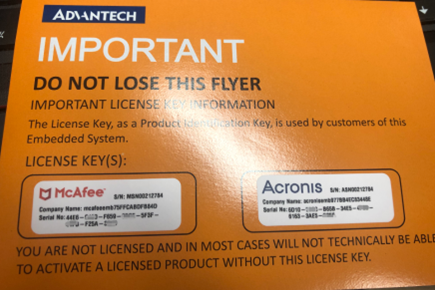
Enter the Company Name and Serial Number from the sticker on the Advantech hardware. Make sure to enter the Company Name and Serial Number exactly as they appear on the sticker license. There should be a sticker located on the Advantech hardware that provides the necessary license details.


By default, the system creates a hidden partition that uses half of the available disk space for backups. This partition must be larger than the space currently used by the operating system and data. If you have multiple volumes, you can select a different volume for the ASZ hidden partition.

After completing the installation, the system will automatically reboot and create a hidden partition. You can view the Acronis Secure Zone (ASZ) partition in File Explorer or Disk Management on Windows. This partition is reserved for Acronis backups.

Right-click on the installation file and run it as Administrator.

Click Agree EULA to install.

Enter the Company Name and Serial Number from the sticker on the Advantech hardware. Make sure to enter the Company Name and Serial Number exactly as they appear on the sticker license. There should be a sticker located on the Advantech hardware that provides the necessary license details.


Click Exit to complete the installation. It is recommended to restart the system.

System Backup & Recovery
Start backuping the system by clicking the System Backup button

Start recovering the system by clicking the System Restore button.

System Protection
Start protecting the system by clicking the Protection button.

Setting
The Settings page contains three sections:
Server Connection: Enter the DeviceOn Server credentials here (URL and IoT Key). Selecting the Trial Account option will automatically connect to the DeviceOn Trial Site for evaluation purposes.
VNC: The DeviceOn Agent includes built-in UltraVNC for remote desktop access. You can specify a custom VNC server location if preferred. To disable remote desktop, select “Disable KVM Connection”.
Intel AMT: The Agent integrates Intel AMT (Intel Active Management Technology) for remote power cycling and remote desktop even if the OS crashes. This requires Intel Core i5/i7 hardware and the device must be on the same LAN as the Server. First enable and configure iAMT in the device BIOS. Then provide the iAMT account credentials here to enable remote management features.

Logout and Change Passwords
The icon in the bottom left corner allows you to logout or change your password.

Last updated