DeviceOn
  • Get Started
    • ⬇️Resources Download
    • 💡About DeviceOn
      • Feature Highlight
      • Cloud Versions
      • Agent Versions
      • Security Architecture
    • 🛠️Installation and Deployment
      • Server (Standard)
        • Windows
        • Ubuntu
        • Azure Marketplace
        • AWS Marketplace
      • Server (Enterprise)
        • Azure Kubernetes
      • Agent
        • Windows
        • Ubuntu
    • ⏲️Version History
      • Version 5.3.12
      • Version 5.2.4
      • Version 5.1.2
      • Version 5.0.3
      • Version 4.7.2
      • Version 4.6.3
      • Version 4.5.5
      • Version 4.4.2
      • Version 4.3.10
      • Version 4.3.3
      • Version 4.2.3
    • ❓FAQ
      • General
      • Technical
  • SECURITY STANDARD
    • ISA/IEC 62443
    • Compliance
  • User Interface & Functions
    • 💻Server (Standalone)
      • Server Management Tools
      • Background Service
  • 🖥️Agent
    • User Interface
    • Background Services
  • 🏠Web User Interface
    • Overview
    • Device Management
      • Device List
      • Real-time Monitoring & Rule Engine
      • Remote Control & Diagnostic
      • Device Data
      • Device Group
      • Task Management (Batch Control)
      • Provision & Configuration
      • Anomaly Detection
    • App Management (OTA)
    • Container Management
    • System Setting
    • Dashboard
    • Event Logs
    • Account Management
  • LAB
    • 📦Application (OTA)
      • Package and Deploy your Application
      • Security Update for Windows
      • Upgrade DeviceOn Agent in On-premises DeviceOn Server
  • 🔧Out-of-Band
    • Intel AMT
      • Local Management (iAMT)
      • Cross-Network Integration (Open AMT)
    • IPMI
    • AMD DASH
    • Advantech iBMC
    • Advantech EdgeBMC
  • 🌐System
    • Update DeviceOn Server to the Latest Version
    • Enabling Automated Backups and Restores from Backup Archives
    • Enable Passive Mode on FTP Server
    • Enable HTTPs for DeviceOn Web Service
    • License Management
  • ⚒️Managed Devices
    • Set up Device Thresholds and Enable Trigger Notifications
    • Set up the Application Watchdog and Enable Trigger Notifications
    • Visualize Device Data through Grafana Dashboards
    • Onboard Multiple Devices at Once
    • Securely Connect to DeviceOn using x.509 Certificates
    • Enable Windows Lockdown Features
Powered by GitBook
On this page
  • Dependencies:
  • Steps to Configuration

Was this helpful?

  1. System

Enable HTTPs for DeviceOn Web Service

PreviousEnable Passive Mode on FTP ServerNextLicense Management

Last updated 1 year ago

Was this helpful?

Generate Let’s Encrypt certificate using Certbot for DeviceOn.

  • Let’s Encrypt is a new free, automated, and open source, Certificate Authority.

  • Certbot is a console based certificate generation tool for Let’s Encrypt. In this recipe, we will generate a Let’s Encypt certificate using Certbot. This certificate will then be deployed for use in the DeviceOn server.

Dependencies:

  • Port 443 for https needs to be open and available at time of executing certbot.

  • Certbot needs root access while executing because only root is allowed to bind to any port below 1024.

  • We will be using our own domain as an example in this recipe. Replace with your own domain under your setup.

Steps to Configuration

  • Step 1: Install Certbot

Install Certbot by following the documentation at Since the DeviceOn Web service is running on Apache Tomcat, please select to “Apache” and “Windows” to downloads Certbot installer.

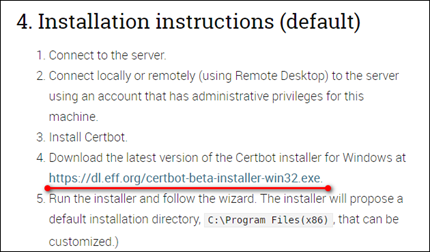
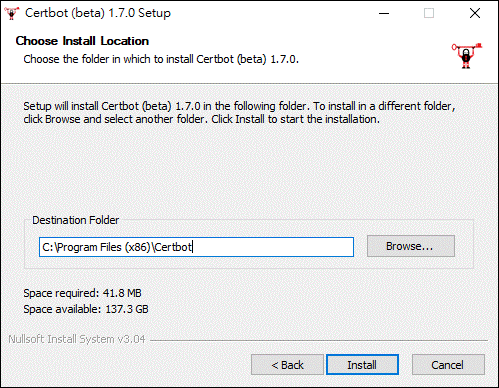
Run the installer and follow the wizard. The installer will propose a default installation directory, C:\Program Files(x86), that can be customized.)

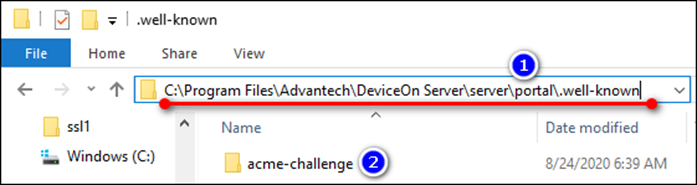
  • Step 2: Create the folder to authenticate

Create the folder named acme-challenge under <DeviceOn Folder>\server\portal.well-known. If the folder “.well-known” is not exist, please create it manually (via CLI, for example: mkdir).

  • Step 3: Choose how you’d like to run Certbot

Run the following command to create credential files and enter your website information. The domain name(s) should input yours and the webroot to \DeviceOn Path\server\portal\

certbot.exe certonly --webroot
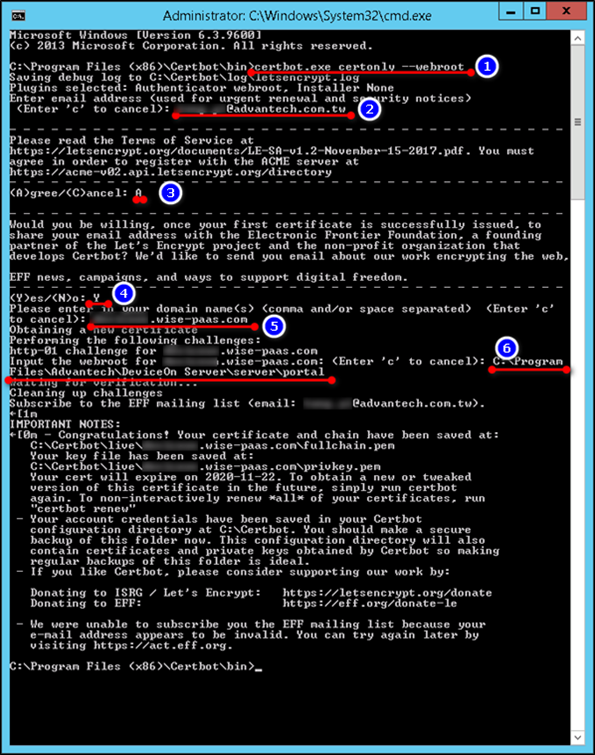
  • Step 4: Install your certificate

You’ll need to install your new certificate in the configuration file or interface for your webserver. Certificates are located in C:\Certbot\live[certificate_name], where [certificate_name] is the name of your certificate (usually the first domain if the –cert-name flag has not been used on the certonly command)

  • Step 5: Install your certificate on DeviceOn Web Services

    • Open the server.xml on text editor tool that located in the \DeviceOn Path\tomcat\conf\

    • Please append the new XML attribute 'Connector' within the 'Service' tag, and provide the certification path (lines 26 to 28) that was generated during Step 4.

<Connector port="443"   
    protocol="org.apache.coyote.http11.Http11AprProtocol"  
    connectionTimeout="20000"  
    useSendfile="false"  
    compression="on"  
    compressionMinSize="2048"  
    noCompressionUserAgents="gozilla, traviata"  
    compressableMimeType="text/html,text/xml,text/plain,text/css,text/javascript,application/javascript,application/xml,application/json"  
    redirectPort="8443"  
    maxThreads="150"  
    scheme="https"  
    secure="true"  
    SSLEnabled="true">    
    <UpgradeProtocol className="org.apache.coyote.http2.Http2Protocol"  
        overheadWindowUpdateThreshold="-1"  
        overheadDataThreshold="-1"  
        writeTimeout="-1"  
        streamWriteTimeout="-1"  
        streamReadTimeout="-1"  
        maxHeaderSize="8192"  
        maxConcurrentStreams="300"  
        readTimeout="-1"  
        compressibleMimeType="text/html,text/xml,text/plain,text/css,text/javascript,application/javascript,application/json"  
        compression="on" compressionMinSize="1024"/>    
    <SSLHostConfig>  
        <Certificate certificateKeyFile="C:\Certbot\live\<DNS>\privkey.pem"    
                     certificateFile="C:\Certbot\live\<DNS>\cert.pem"    
                     certificateChainFile="C:\Certbot\live\<DNS>\fullchain.pem"    
                     type="RSA" />    
    </SSLHostConfig>    
</Connector>
  • Step 6: Restart DeviceOn web services (Tomcat_IoT) to reload the configuration

  • Step 7: Replace the certificate files that in the websockify folder.

    xcopy "C:\Certbot\live\<DNS>\privkey.pem" "<INSTALLER_PATH>\server\portal\WEB-INF\classes\novnc\websockify\wise-paas.com.private.key" /Y
    xcopy "C:\Certbot\live\<DNS>\cert.pem" "<INSTALLER_PATH>\server\portal\WEB-INF\classes\novnc\websockify\wise-paas.crt" /Y
  • Step 8: Enable to automatic renewal

Create a batch file named restartTomcat.bat which content as below

Copy the batch file into C:\Certbot\renewal-hooks\post\

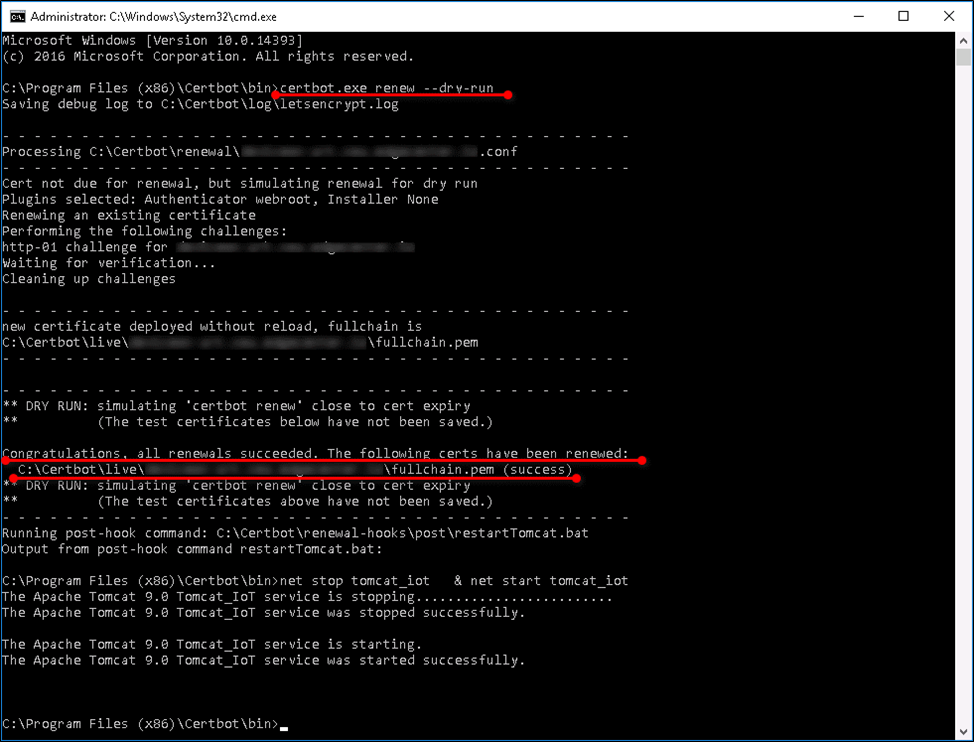
  • Step 9 (Optional): Test automatic renewal, please run the following command

    certbot.exe renew –dry-run
  • Step 10 (Optional): If you get all renewals succeeded, it means your configuration is correct.

  • Step 11: Turn Windows firewall on inbound port 443 for your HTTPS, and make sure your network security rules allow.

After making the update, click 'Apply' and then restart the Tomcat service.

Scrolling down the instruction, you may get the installer package on Step 4.

Step 12: Use the tool to update your web server configuration. For instance, if your previous web service URL was http://<YOUR_DNS>:8080, change it to https://<YOUR_DNS>.

🌐
https://dl.eff.org/certbot-beta-installer-win32.exe
myminio.com
https://certbot.eff.org/
Server Configuration